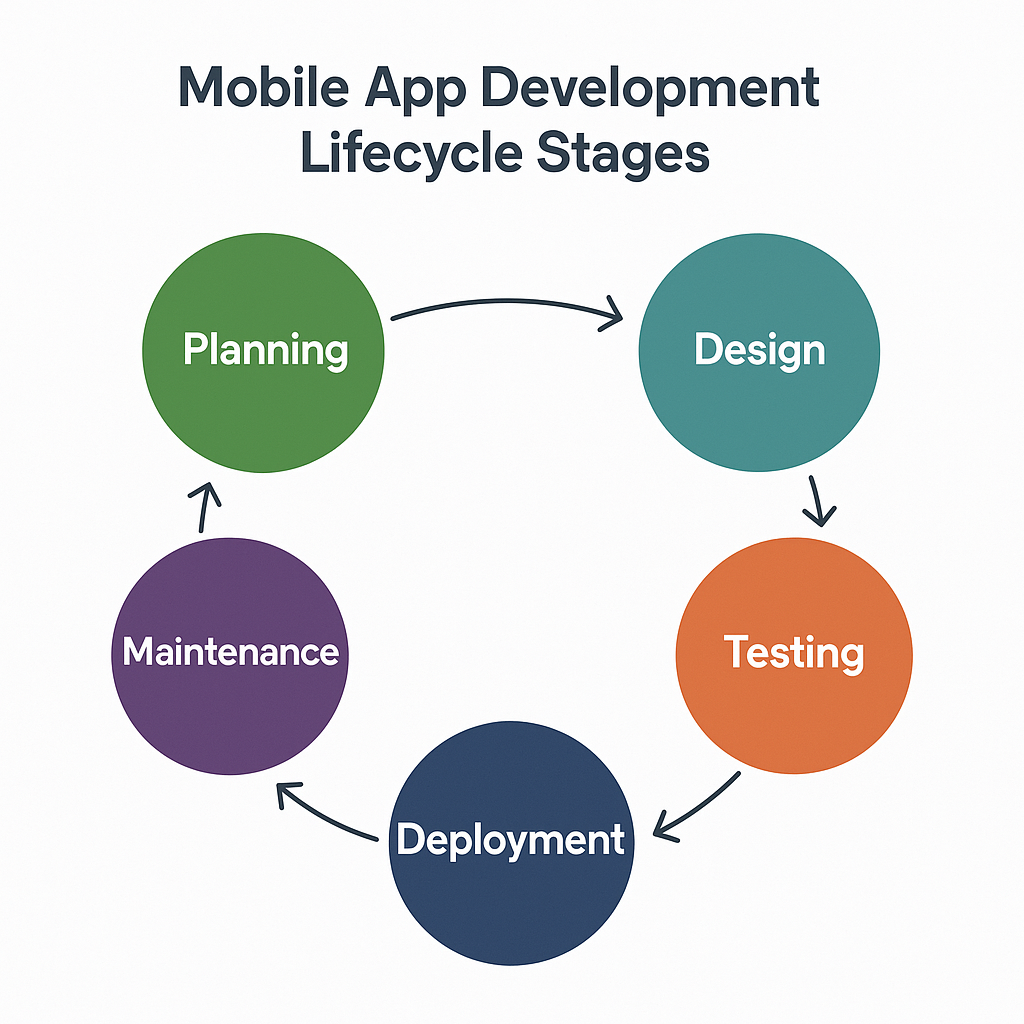
- A. The Modern Mobile App Development Lifecycle: A High-Level Overview
- B. Stage 1: Discovery and Strategy
- C. Stage 2: Planning and Prototyping
- D. Stage 3: Development and Implementation
- E. Stage 4: Testing and Quality Assurance
- F. Stage 5: Deployment and Launch
- G. Stage 6: Post-Launch Maintenance and Iteration
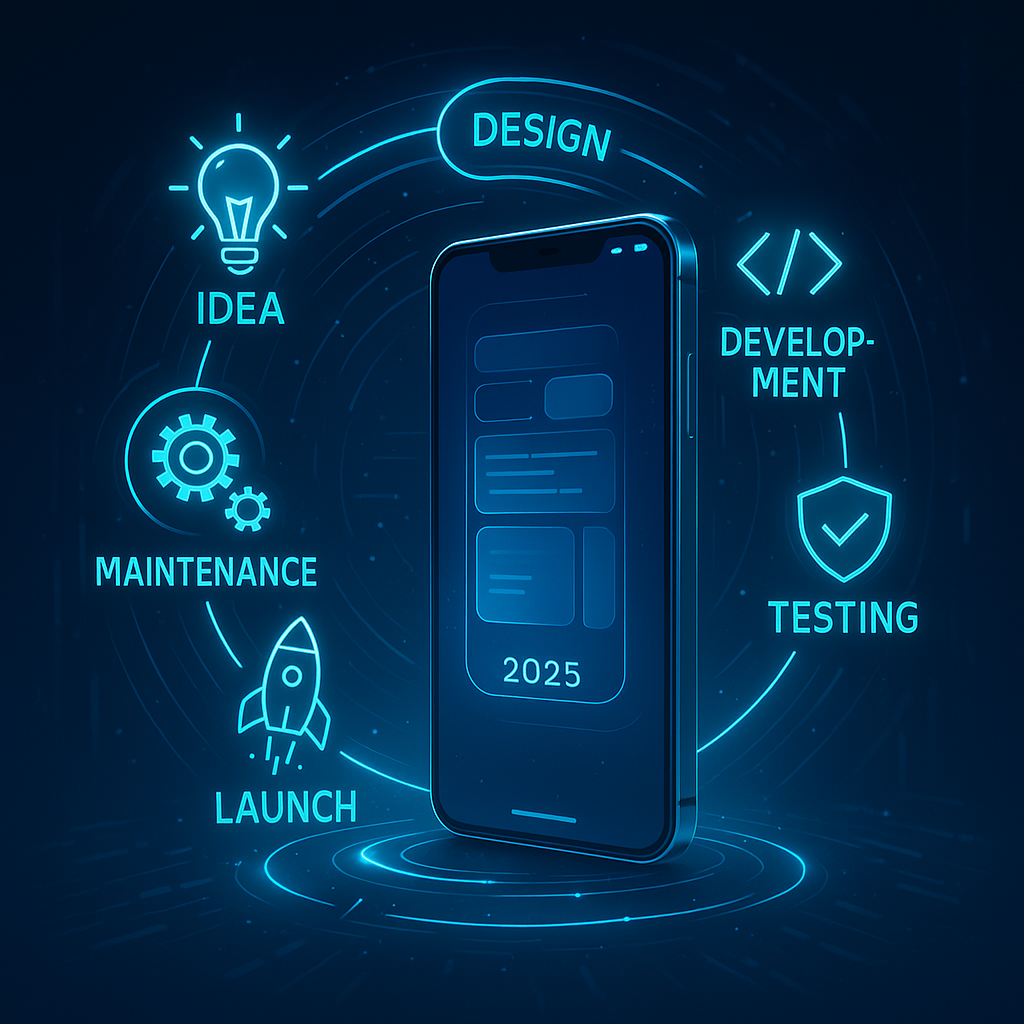
The Modern Mobile App Development Lifecycle: A High-Level Overview
Embarking on the journey to create a mobile application is much like building a house. You wouldn’t start laying bricks without a detailed blueprint, a clear understanding of the land, and a plan for who will live there. Similarly, successful mobile apps are not born from a single flash of inspiration followed by frantic coding. They are the result of a structured, methodical process known as the mobile app development lifecycle. This lifecycle is a framework that guides a project from its initial idea to its launch and beyond, ensuring that the final product is well-conceived, robust, and meets the needs of its users. While traditional software development sometimes followed a rigid, sequential Waterfall model, the modern mobile landscape, characterized by rapid innovation and evolving user expectations, almost universally favors an Agile, iterative approach. This means the lifecycle isn’t a straight line but a continuous loop of building, testing, and learning. Each stage informs the next, and the entire process is designed for flexibility, allowing teams to adapt to new information and user feedback. Understanding these stages is the first and most critical step for any aspiring developer, project manager, or entrepreneur looking to make a mark in the competitive app marketplace. It provides the roadmap needed to navigate the complexities of app creation, manage resources effectively, and ultimately increase the chances of building an app that people love and use.
Stage 1: Discovery and Strategy
This foundational stage is all about asking the right questions before a single line of code is written. It’s where the core idea is scrutinized, refined, and validated against market realities. A brilliant concept is not enough; it must solve a real problem for a specific audience and have a viable path to success. Skipping or rushing this phase is a common reason why many apps fail to gain traction.
Defining the App’s Purpose and Goals
Every successful app begins with a clear value proposition. What specific problem does your app solve for its users? Is it simplifying a tedious task, providing entertainment, connecting people, or offering a service in a more convenient way? This purpose must be crystal clear. Alongside the user-centric goal, you must define the business objectives. Is the primary goal to generate direct revenue, enhance brand visibility, improve customer loyalty, or streamline internal business operations? These goals will dictate key decisions throughout the lifecycle. For example, an app designed to increase brand engagement might prioritize features that encourage social sharing, while an app focused on operational efficiency will emphasize speed, reliability, and integration with existing systems. A well-defined purpose acts as a North Star, guiding the entire team and ensuring every feature and design choice aligns with the overarching mission.
Market and Competitor Analysis
Once the “what” and “why” are established, it’s time to understand the landscape. This involves deep market research to identify and understand your target audience. Who are they? What are their demographics, behaviors, and technological preferences? Creating detailed user personas can bring this audience to life, helping the team empathize with future users. The next step is a thorough competitor analysis. Identify existing apps in your chosen niche. Download them, use them, and read their user reviews. What do they do well? Where do their weaknesses lie? The negative reviews are often a goldmine of information, revealing user pain points and feature gaps that your app can potentially fill. This analysis helps you find your unique selling proposition (USP)—the distinct feature or quality that will make your app stand out from the crowd. In a market with millions of apps, differentiation is not just an advantage; it’s a necessity. According to data.ai’s “State of Mobile 2024” report, mobile consumer spending is projected to reach a staggering $207 billion, highlighting the immense financial opportunity but also the fierce competition for user attention and dollars.
Feasibility and Monetization Strategy
The final piece of the discovery puzzle is a reality check. Technical feasibility assesses whether the app’s proposed features can be built with available technology, expertise, and resources. Are there any significant technical hurdles that could derail the project? Financial feasibility involves creating a preliminary budget, estimating development costs, and projecting potential return on investment (ROI). This is also the stage to decide on a monetization strategy. How will the app make money? Common models include a one-time purchase (paid), recurring payments (subscription), offering a basic version for free with premium features available for purchase (freemium), in-app purchases for digital goods, or generating revenue through in-app advertising. The chosen model will fundamentally influence the app’s design and user experience. For instance, a subscription-based app must continuously deliver high value to justify the recurring cost, whereas an ad-supported app needs to balance revenue generation with a non-intrusive user experience.
Stage 2: Planning and Prototyping
With a validated strategy in hand, the planning stage translates the abstract ideas from the discovery phase into a concrete and actionable blueprint. This is where the app’s structure, look, and feel begin to take shape, and critical technical decisions are made. It’s the bridge between a great idea and its tangible implementation.
Requirements Gathering and Feature Prioritization
This step involves documenting every detail of the app’s functionality. A Product Requirements Document (PRD) is often created, serving as a single source of truth for the development team. It outlines user stories, functional requirements, and technical specifications for each feature. However, it’s rarely feasible or wise to build every desired feature for the initial launch. This is where the concept of a Minimum Viable Product (MVP) becomes crucial. An MVP is the version of the app that includes just enough core features to be useful to early adopters and validate the main business idea. It allows you to get the product to market quickly, gather real-world user feedback, and iterate based on data rather than assumptions. To decide what goes into the MVP, teams often use prioritization techniques like the MoSCoW method. This framework categorizes features into Must-haves, Should-haves, Could-haves, and Won’t-haves (for the initial release), ensuring that development efforts are focused on what matters most.
| Category | Description | Example (for a food delivery app) |
|---|---|---|
| Must-have | Critical for the app to function and be considered viable. | User registration, search restaurants, view menus, place an order. |
| Should-have | Important but not vital for launch. App will work without them. | Order tracking, saving favorite restaurants, user reviews. |
| Could-have | Desirable “nice-to-have” features if time and resources permit. | Social sharing of orders, dietary filtering, loyalty program. |
| Won’t-have | Features explicitly excluded from the current development scope. | In-app meal planning, catering requests. |
User Experience (UX) and User Interface (UI) Design
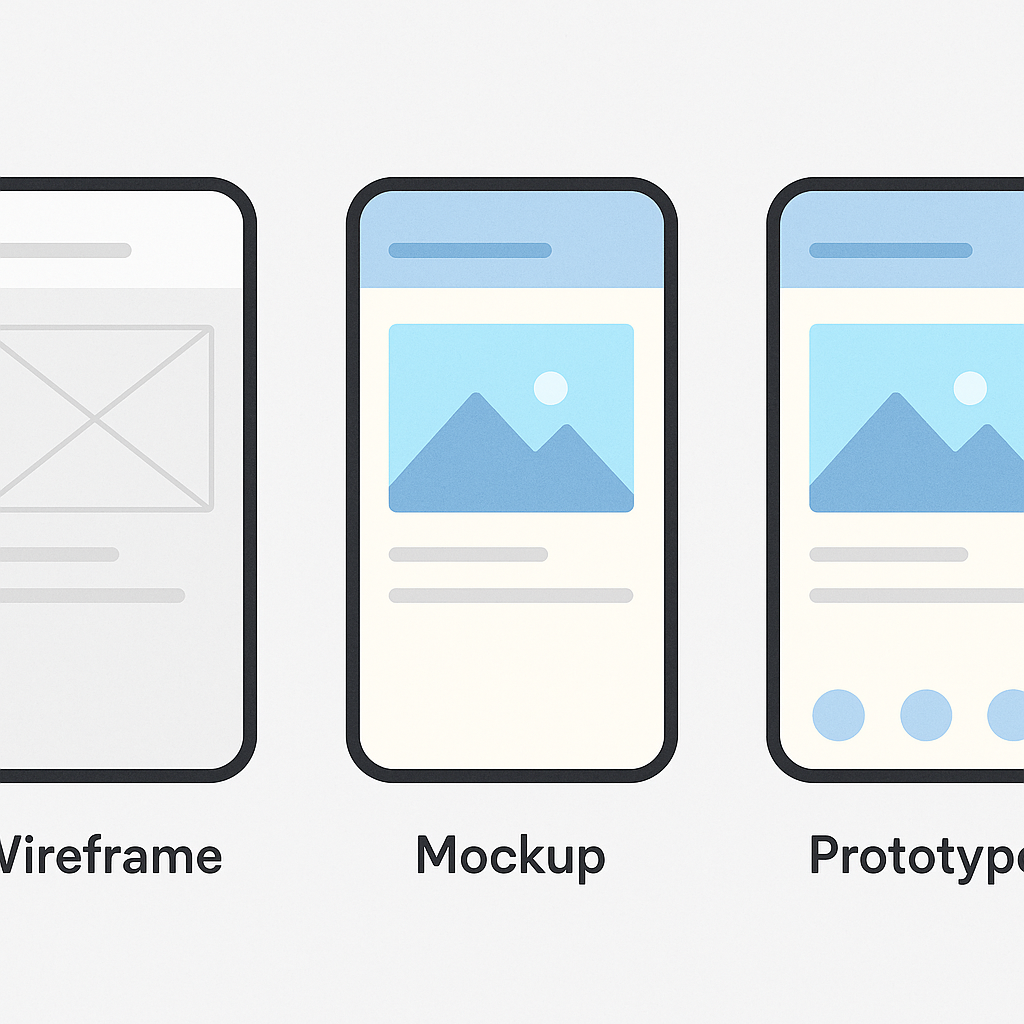
This is where the app’s personality and usability are forged. While often grouped together, UX and UI design are distinct but interconnected disciplines. UX (User Experience) design is the science of making the app logical, intuitive, and easy to use. UX designers focus on the overall feel of the experience, creating the information architecture, user flows, and wireframes. A wireframe is a low-fidelity, black-and-white schematic that lays out the app’s structure and the placement of elements on each screen. UI (User Interface) design, on the other hand, is the art of making the app visually appealing. UI designers build upon the wireframes, defining the color palette, typography, iconography, and animations. They create high-fidelity mockups and interactive prototypes that look and feel like the final product. This allows stakeholders to test the user flow and provide feedback before development begins, which is far more cost-effective than making changes later in the process. Adhering to platform-specific guidelines, such as Google’s Material Design for Android and Apple’s Human Interface Guidelines for iOS, is essential for creating an experience that feels native and familiar to users. As modern UI development becomes more declarative, understanding how design translates to code is vital. The principles of modular design are directly reflected in frameworks that leverage the Lifecycle of Composables in Jetpack Compose.
Technology Stack Selection
The final pillar of the planning phase is choosing the right tools for the job. The technology stack is the combination of programming languages, frameworks, databases, and services used to build the app. This is a critical decision with long-term implications for scalability, performance, and maintenance costs. The first choice is the platform: native iOS, native Android, or a cross-platform solution. Native development (using Swift/SwiftUI for iOS and Kotlin/Jetpack Compose for Android) typically offers the best performance and deepest integration with the operating system. Cross-platform development frameworks like Flutter or React Native allow you to write code once and deploy it on both platforms, which can save time and money but may involve performance or feature limitations. The choice of the backend stack is equally important. This includes the server-side programming language (like Node.js, Python, or Go), the database (SQL like PostgreSQL or NoSQL like MongoDB), and the cloud infrastructure provider (such as Amazon Web Services, Google Cloud, or Microsoft Azure). For many projects, a Backend as a Service (BaaS) platform like Firebase can significantly accelerate development by providing pre-built solutions for authentication, databases, and file storage. If you are just starting, a Firebase Tutorial: Getting Started can be an invaluable resource to understand its potential.
Stage 3: Development and Implementation
This is the phase where the blueprints and designs from the previous stages are transformed into a tangible, working application. It is typically the longest and most resource-intensive stage of the lifecycle, where the core engineering work takes place. The development process itself is usually broken down into smaller, manageable cycles, especially when following an Agile methodology.
Setting Up the Development Environment
Before coding can begin, a robust infrastructure must be established to support the development team. This starts with setting up a version control system, with Git being the undisputed standard. Using platforms like GitHub, GitLab, or Bitbucket allows multiple developers to work on the same codebase simultaneously, track changes, and revert to previous versions if needed, which is essential for collaboration and code integrity. Alongside version control, teams use project management tools like Jira, Asana, or Trello to organize tasks, track progress, and manage workflows. These tools provide visibility into the project’s status and help keep everyone aligned. For modern, efficient teams, establishing a Continuous Integration and Continuous Deployment (CI/CD) pipeline is a best practice. CI/CD automates the process of building, testing, and deploying the app, allowing for faster and more reliable releases. Every time a developer commits code, the CI server can automatically build the app and run a suite of automated tests, catching bugs early and ensuring the codebase remains stable.
Frontend and Backend Development
The core of this stage is the actual coding, which is typically divided into two parallel streams: frontend and backend. Frontend development involves building the client-side of the application—everything the user sees and interacts with. Developers use the UI mockups and prototypes as a guide to implement the user interface, build out the navigation, and integrate the logic for user interactions. This is where the chosen technology stack, whether it’s native Swift/Kotlin or a cross-platform framework, comes into play. Backend development focuses on the server-side components that power the app. This includes building the server logic, setting up the database to store and retrieve data, and creating the Application Programming Interfaces (APIs). APIs act as the communication bridge between the frontend and the backend. For example, when a user signs up in the app, the frontend sends the user’s details to a specific API endpoint, and the backend processes this request, validates the data, and stores it in the database. These two streams of development must work in perfect harmony, requiring constant communication and well-defined API contracts to ensure seamless integration.
Importance of Clean Code and Architecture
Simply making an app work is not enough; how it is built matters profoundly. Writing clean, well-documented, and maintainable code is crucial for the long-term health of the project. A codebase that is difficult to understand will be challenging to debug, update, and scale. This is where software architecture patterns come in. Architectures like Model-View-ViewModel (MVVM) or Model-View-Intent (MVI) provide a structured way to organize code, separating concerns and making the application more robust and testable. A well-architected app is easier to modify, as changes in one part of the system are less likely to break another. It also simplifies the process of onboarding new developers to the team. Investing time in good architecture and clean code practices during the development stage pays significant dividends down the line, reducing technical debt and making it easier to add new features and adapt to future requirements. There are many resources available to help developers master these concepts, such as this guide on Clean Architecture for Android.
Stage 4: Testing and Quality Assurance
Once the initial development is complete, the application enters the critical Quality Assurance (QA) stage. The goal here is to find and fix as many bugs, inconsistencies, and performance issues as possible before the app reaches the end-user. A buggy or unstable app can quickly lead to negative reviews, high uninstall rates, and irreparable damage to the brand’s reputation. Thorough testing is not a one-time event but an ongoing process that should be integrated throughout development. It ensures the app is stable, performs well, is secure, and provides the seamless user experience that was envisioned during the design phase.
Types of Mobile App Testing
A comprehensive QA strategy involves multiple types of testing to cover all aspects of the application’s quality. Functional testing is the most basic type, verifying that each feature of the app works according to the requirements specified in the PRD. Does tapping this button do what it’s supposed to do? Does this form submit correctly? Usability testing goes a step further, evaluating how easy and intuitive the app is to use, often by observing real users as they try to complete tasks. Performance testing is crucial for mobile apps; it measures key metrics like app launch time, responsiveness, battery consumption, and memory usage. An app that drains the battery or feels sluggish will quickly be abandoned. Compatibility testing ensures the app works correctly across a wide range of devices, screen sizes, operating system versions, and network conditions. This is particularly challenging in the fragmented Android ecosystem. Finally, security testing is paramount for protecting user data. It involves looking for vulnerabilities that could be exploited by malicious actors, such as insecure data storage or unencrypted data transmission. Awareness of the underlying system, such as the Android Lifecycle, is critical for writing effective tests that account for how the OS manages an app’s state.
| Testing Type | Primary Goal | Key Questions |
|---|---|---|
| Functional | Verify features work as specified. | Does this button lead to the correct screen? |
| Usability | Ensure the app is intuitive and user-friendly. | Can a new user figure out how to complete a core task? |
| Performance | Check for speed, stability, and resource usage. | How much battery does the app use? Does it lag on older devices? |
| Compatibility | Ensure consistent operation across devices/OS. | Does the layout look correct on a small phone and a large tablet? |
| Security | Identify and fix vulnerabilities. | Is sensitive user data encrypted both at rest and in transit? |
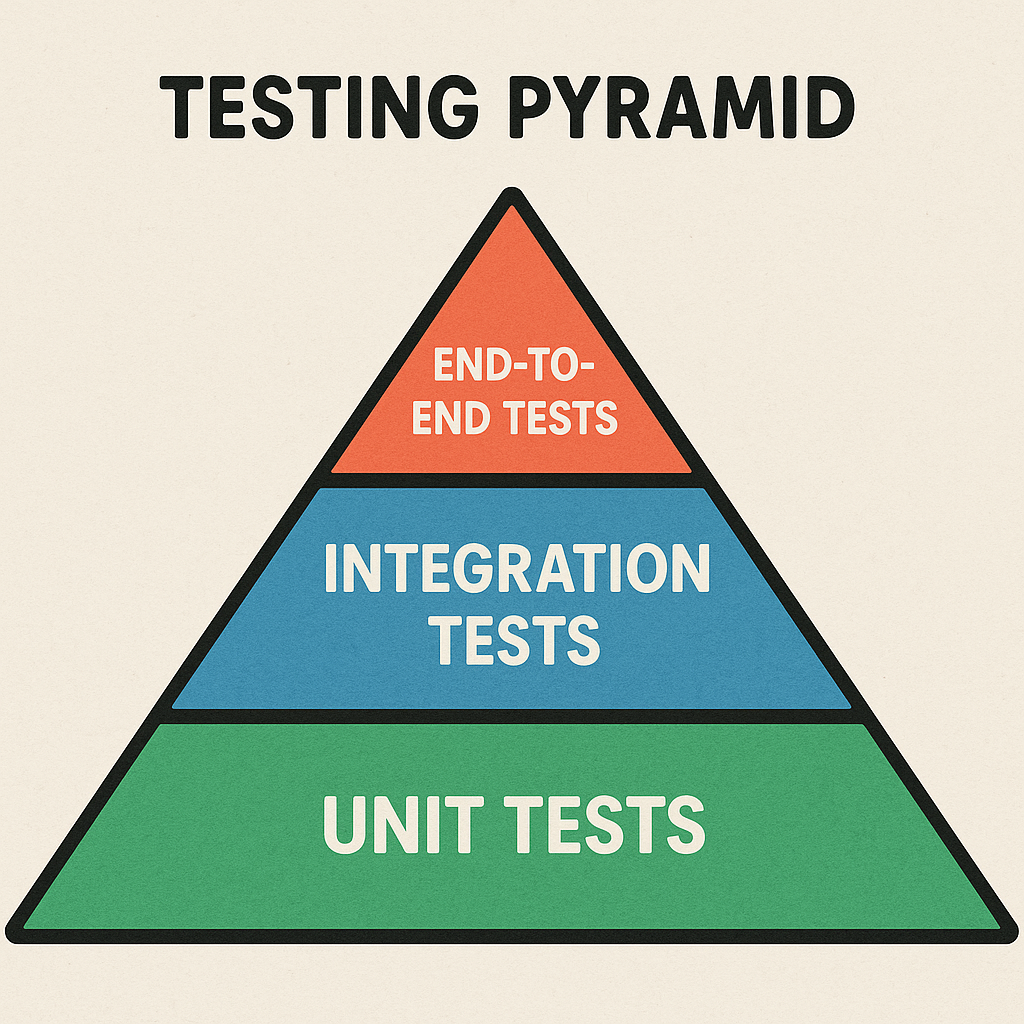
The Role of Automated vs. Manual Testing
The testing process typically employs a mix of manual and automated approaches. Manual testing involves human testers who interact with the app like a real user would. They follow test cases to check functionality but can also perform exploratory testing, where they use their intuition and experience to uncover unexpected bugs and usability issues. This human element is invaluable for assessing the overall user experience. Automated testing, on the other hand, uses scripts and software to execute tests automatically. This includes unit tests, which check individual components or functions of the code in isolation, and UI tests, which simulate user interactions to verify the interface behaves as expected. While automated tests require an initial investment to write, they can be run quickly and repeatedly, making them perfect for regression testing—ensuring that new code changes haven’t broken existing functionality. The most effective QA strategies find the right balance, using automation for repetitive, predictable checks and reserving manual testing for usability, exploratory, and more complex scenarios.
Stage 5: Deployment and Launch
After rigorous development and testing, the app is finally ready to be released to the world. The deployment stage involves preparing the application for submission to the app stores and executing a well-planned launch strategy. This is a moment of truth, where the app transitions from a development project to a live product in the hands of users. Careful planning is essential to ensure a smooth and successful debut.
Preparing for App Store Submission
Getting an app onto the Google Play Store and the Apple App Store is a process in itself. Each platform has its own set of detailed guidelines and a review process that your app must pass. This requires creating a compelling app store listing. Key elements include a unique and memorable app icon, high-quality screenshots and video previews that showcase the app’s functionality, and well-written promotional text and descriptions. App Store Optimization (ASO) is the practice of strategically choosing keywords for your app’s title and description to improve its visibility in store search results. It’s crucial to thoroughly read and understand the store guidelines to avoid rejection. For example, Apple’s App Store Review Guidelines are famously strict, with a strong focus on security, privacy, and user experience. Recently, policies like Apple’s App Tracking Transparency (ATT) framework have become a critical consideration for any app that uses advertising or analytics, requiring explicit user consent for tracking. Failing to comply with these rules can lead to lengthy delays or outright rejection, so it’s vital to do your homework. To stay current, it’s always best to review Apple’s latest guidelines directly.
The Launch Process
A “big bang” launch where the app is released to everyone at once can be risky. If an unexpected critical bug surfaces, it could affect your entire initial user base. To mitigate this risk, many developers opt for a more controlled rollout. Beta testing is a common first step, where the app is released to a limited group of users through platforms like Apple’s TestFlight or the Google Play Console’s beta tracks. This allows you to gather final feedback and catch last-minute issues in a real-world environment. Following a successful beta, a phased rollout is a smart strategy. Both Google Play and the App Store allow you to release the app to a small percentage of users initially (e.g., 1%) and gradually increase the percentage over several days. This approach lets you monitor performance and stability closely, and if a major problem arises, you can pause the rollout, fix the issue, and resume without impacting all users. The launch itself should be supported by a marketing plan to generate initial buzz and drive downloads, which could include social media campaigns, press outreach, or paid advertising.
Stage 6: Post-Launch Maintenance and Iteration
The journey of a mobile app is far from over once it’s launched. In many ways, this is just the beginning. The post-launch phase is a continuous cycle of monitoring, supporting, and improving the app based on real-world data and user feedback. Successful apps are not static; they evolve over time to meet changing user needs, adapt to new technologies, and stay ahead of the competition. This final stage brings the lifecycle full circle.
Monitoring and Analytics
Once the app is live, it’s essential to track its performance meticulously. This involves setting up analytics tools to monitor Key Performance Indicators (KPIs). Services like Google Analytics for Firebase or Mixpanel can provide deep insights into user behavior. Important metrics to watch include the number of downloads, Daily and Monthly Active Users (DAU/MAU), user retention and churn rates, session length, and conversion rates for your key goals. Equally important is crash reporting and performance monitoring. Tools like Sentry or Firebase Crashlytics can alert you in real-time when your app crashes or experiences performance issues, allowing you to proactively identify and fix problems before they affect a large number of users. This data-driven approach is fundamental to making informed decisions about the app’s future direction.
User Feedback and Support
Your users are your most valuable source of information for improving your app. It’s crucial to establish clear channels for them to provide feedback and receive support. This starts with actively monitoring app store reviews. Respond to both positive and negative reviews professionally; thank users for their praise and acknowledge the issues raised in critical feedback. This shows that you are listening and care about their experience. Beyond the app stores, monitor social media channels and consider creating a dedicated support email or in-app feedback form. Every piece of user feedback, whether it’s a bug report, a feature request, or a general complaint, is an opportunity to improve. This feedback should be systematically collected, categorized, and used to inform the product backlog for future updates.
Continuous Updates and Feature Enhancements
The insights gathered from analytics and user feedback fuel the ongoing development cycle. The post-launch phase is a perpetual loop of the earlier lifecycle stages, just on a smaller scale. You will continuously be planning new features, designing UX/UI improvements, developing them, testing them, and deploying them as updates. This iterative process is what keeps an app relevant and successful over the long term. The work involves not only adding exciting new features but also performing essential maintenance. This includes fixing bugs discovered after launch, ensuring the app remains compatible with new operating system versions from Apple and Google, and refactoring code to improve performance and reduce technical debt. By embracing this cycle of continuous improvement, you transform a one-time product launch into a dynamic, evolving service that builds a loyal user base and achieves lasting success.
Navigating the mobile app development lifecycle requires a blend of strategic thinking, technical expertise, and a deep commitment to the user. Each stage, from the initial spark of an idea to the ongoing process of maintenance and iteration, plays a vital role in shaping the final product. By understanding and respecting this structured process, you can transform a great idea into a high-quality, successful mobile application. Whether you are just beginning your journey in mobile development or looking to refine your process, Kodeco is here to support you at every stage with expert-led courses, books, and tutorials designed to build your skills and confidence.
Leave a Reply